Friday, December 6, 2013

What is Joomla! Framework?

The Joomla! Framework™ is a new PHP framework (a collection of software libraries/packages) for writing web and command line applications in PHP, without the features and corresponding overhead found in the Joomla! Content Management System (CMS). It provides a structurally sound foundation, which is easy to adapt and easy to extend.
The Joomla! Framework is free and open source software, distributed under the GNU General Public License version 2 or later; and is comprised of code originally developed for the Joomla! CMS™.

The Joomla! Framework should not be confused with the hugely popular Joomla! CMS. It is important to remember that you do not need to install the Joomla! Framework to use the CMS, nor do you need to install the Joomla! CMS to use the Framework.


Getting Started

The new Joomla! Framework is now available to install via Composer and you can find the list of packages on Packagist.org. There are plenty of avenues you can explore to get started on working with the Framework.
For the official docs, check out the README file found in each package. You can also review the Joomla! Framework page on GitHub.

Get the Sample Application

The easiest way to get to know the Joomla! Framework is to start with the sample app.

  1. Install Composer.
  2. Download this sample app repository from GitHub.
  3. Run "composer install".
  4. View in your browser.

Friday, September 27, 2013

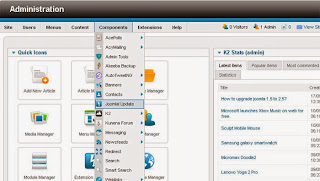
Joomla Update Component Missing from Admin Menu

On before 2.5.4 the Joomla core has not joomla update component. But starting with version 2.5.4, the Joomla core is updated with the new component Joomla Update instead of in Extensions/Install/Update.

If Joomla Update does not shows in components menu.  That means menu items in database #__menu table  are not updated. (#__menu is a database table name)

Open the database And run this SQL statement: 

UPDATE  #__menu SET component_id = (SELECT extension_id FROM tp_extensions WHERE name = "com_joomlaupdate") WHERE title = "com_joomlaupdate"


It should update 1 row. If it show 0 row updated that means missing the entry in the database table #__menu.
Run this SQL statement

INSERT INTO `#__menu` (`id`, `menutype`, `title`, `alias`, `note`, `path`, `link`, `type`, `published`, `parent_id`, `level`, `component_id`, `ordering`, `checked_out`, `checked_out_time`, `browserNav`, `access`, `img`, `template_style_id`, `params`, `lft`, `rgt`, `home`, `language`, `client_id`) VALUES (22, 'menu', 'com_joomlaupdate', 'Joomla! Update', '', 'Joomla! Update', 'index.php?option=com_joomlaupdate', 'component', 0, 1, 1, 28, 0, 0, '0000-00-00 00:00:00', 0, 0, 'class:joomlaupdate', 0, '', 41, 42, 0, '*', 1);

It must update 1 row.

Table #__menu is now updated with an entry com_joomlaupdate at id 22.


Now open  joomla administrator. Now there will be a menu joomla update under components menu.


Wednesday, September 18, 2013

How to upgrade Joomla 2.5 to 3.1?

Step 1:
Make sure you have a current backup of your site.

Step2: 
PHP 5.3.1 is required for joomla 3.x
Check these in php.ini file.
1.    register_globals  must be off
2.    magic_quotes_gpc  must be off
Supported Databases:
1.    MySQL (InnoDB support required) 5.1 +
2.    MSSQL 10.50.1600.1 +
3.    PostgreSQL 8.3.18 +
Supported Web Servers:
1.    Apache(with mod_mysql, mod_xml, and mod_zlib)  2.x+

Step3:
The recommended way to upgrade Joomla version is to use the Joomla Update component found in the Components menu of your site Administrator. This will show an update indication. If it is showing joomla is up to date then go to the site maintenance option and clean all cache an purge cache and global checkin. Now refresh the page.
it will show the update indication.


Step4:
Click at this icon you will get this screen .

Here if Joomla update will show your current joomla version2.5.x and Latest joomla version 2.5.x. But you want to upgrade your joomla to 3.1 vesion . Then go to the options .

Step5:  

Select Short term support from Update server option and save it. It now show  latest joomla version is 3.1.5. Even if it’s not showing 3.1.x then clear all website cache and also go to control panel and click on Updates are available option and purge cache. After that open Joomla update component and it will surely show latest 3.1.x version.


Now click on Install the update option. And wait until the updation process completion. It may take several minutes.

If it shows  Error 500 - JHtmlBehavior::mootools not found. This means current framework does not support this update. Need to change the  framework

After successful update Joomla version is now 3.1.x.


Note- Many of the errors can occurs Because of your installed component, plugins and modules which are not compatible with joomla 3.x.  You Can replace those or you an remove errors.

IMPORTANT-
1-> When updating has completed you may need to refresh your screen or empty your browser cache to adjust for template CSS changes.
2-> Joomla! will notify on your administrator home page (control panel) when an update is needed, but it will not do the update for you. You need to press the button to start the update.

Tuesday, September 17, 2013

How to upgrade joomla 1.5 to 2.5?


Following important initial steps are required to upgrade joomla.
  • Create backup of your website and database.
  • Check your site 1.5 update version of joomla 1.5.26 or above.
  • Check which 3rd party component used in your site and what will need for the new site. If you have extensions on your 1.5 site that you don’t need or care about, it is best to not reinstall them on the new site.
  • Check your template purchase or custom build. If your template is purchased from other template site please check template are available in 2.5 or 3.0 on that site. Otherwise your developer will need to re-create your custom template.
  • Create a new database on the new site server.
Now you can use jupgrade component to upgrade joomla.
You will need to download the jupgrade component from http://redcomponent.com.
Now this component have to install on your website following steps are required.
You will go in administrator->extension manager->install/uninstall.


Now you need to enable the Mootools upgrade plugin.
Path- Extension manager->plugin-manager->System-Mootools-upgrade.


Now you will select component->jupgrade and click.
Jupgrade Basic configuration page will open.


Now you will select parameter button on right top of page.


Set your required parameters which describe in popup window.
Now you will select first page of jupgrade page and click on Jupgrade button.


Note : You will must be install mod_curl of php for upgradation of joomla 1.5 to 2.5 .

After completion of upgradation you will got a upgrade finished message. Now your 2.5 site has been populated your 1.5 website’s articles, categories, menus, menu items, core modules and plugins, languages and users.

Friday, September 13, 2013

How to write a joomla module in Joomla2.5 with video


How to write a joomla module development  in Joomla2.5 with video

A joomla module is a light-weight and flexible extension that is used for page rendering. They’re used for little bits of the page that are usually less complex and are able to be seen across totally different components.

Folder Structure:

Let’s we take module name – mod_latest
Module->mod_latest
  • mod_latest.php
  • mod_latest.xml
  • helper.php
  • index.html
  • tmpl/default.php
  • tmpl/index.php

mod_latest.php

<?php
//license details here
 
//no direct access
       defined(‘_JEXEC’) or die(‘Restricted access’);
//include the syndicate functions only once
       require_once(dirname(__FILE__).DS.’helper.php’);
//load helper class and funtion
       $latest = modLatestHelper::getLatest($params);
//load the layout file from template views
       Require(JModuleHelper::getLayoutPath(‘mod_latest’)); 
 ?>
 
defined(‘_JEXEC’) or die(‘Restricted access’);
 
This line checks to make sure that this file is being included from the joomla! Application. It’s necessary to prevent variable injection and other security.
 
require_once(dirname(__FILE__).DS.’helper.php’);
 
The helper class is defined in our helper.php file. This file is included with a require_once statement. It allows including necessary functions for the module functionality. Heper file calculations, DB connection and query code.
 
$latest = modLatestHelper::getLatest($params);

It is allows to invoke the appropriate helper class method to retrieve the data.

require(JModuleHelper::getLayoutPath(‘mod_latest’));
It includes the template to display the output

mod_latest.xml

  <?xml version="1.0" encoding="utf-8"?>
         <extension
                    type="module"
                    version="2.5"
                    client="click4joomla"
                    method="upgrade"
         >
        <name>mod_latest</name>
        <author>Click 4 Joomla</author>
        <creationDate>July 2013</creationDate>
        <copyright>Copyright (C) 2013 - 2015 click4joomla. All rights reserved. </copyright>
        <license>GNU General Public License version 2 </license>
        <authorEmail>info@click4joomls.com</authorEmail>
        <authorUrl>www. click4joomls.com </authorUrl>
        <version>2.5.0</version>
        <description>MOD_LATEST_XML_DESCRIPTION</description>
        <files>
                    <filename>mod_latest</filename>
                    <filename module=” mod_ latest”>mod_ latest.php</filename>
                    <filename>index.html</filename>
                    <filename>helper.php</filename>
                    <filename>tmpl/default.php</filename>
                    <filename>tmpl/index.php</filename>
        </files>
       <languages>
                    <language tag="en-GB">en-GB.mod_ latest.ini</language>
                    <language tag="en-GB">en-GB.mod_ latest.sys.ini</language>
       </languages>
      <config>
      </config>
</extension>

(This file is used to specify which files the installer needs to copy and is used by the Module Manager to determine which parameters are used to configure the module)

helper.php

<?php
   //license details here
class modLatestHelper
{
                function getLatest($params)
                {
                                Return ‘I am Raghvender Singh’;
                 }
}
?>

index.html This file is included to prevent directory browsing. It can be event left blank and whenever someone will access the directory then this file will be default loaded. default.php


Thursday, September 12, 2013

How to write a joomla module in Joomla2.5


How to write a joomla custom module in Joomla2.5

A Joomla! module is a light-weight and flexible extension that is used for page rendering. They’re used for little bits of the page that are usually less complex and are able to be seen across totally different components.

File Structure:

There are two folder and three files in root (mod_xyz) folder and in the language folder again a subfolder en-GB, in this folder it holds two files en-GB.mod_xyz.ini and en-GB.mod_xyz.sys.ini. In the tmpl folder, it holds default.php.    


(For Example we used name:  mod_xyz)
  1. helper.php:- This file contains the helper class which is used to do right work in retrieving the information to be displayed in the module
  2. mod_xyz.php:- This file is a main file of module. It will perform all necessary initialization routines; we can call all helper routines in this file as well as we call all necessary data in this file. We can call and include the template which will display the output of the module.
  3. mod_xyz.xml:- This file contains all information about the module. In this file, we define all files that need to be time for installation of module.
  4. tmpl->default.php:- This file found in tmpl folder in this module. That page is a structure of a display of module. This file takes data from mod_xyz.php and converted in to html and displays the output.
Two others files which is in language->en-GB folder
  1. en-GB.mod_xyz.ini and en-GB.mod_xyz.xys.ini files are languages files which are used to provide short name of any description or name etc.

Create a file mod_xyz.php:

     There are some task perform in mod_xyz.php
  1. Include helper.php file which contains the class to be used to collect the data.
  2. Invoke the helper class method to retrieve the data.
  3. Include the template to display the requirement output.
The helper file include by:

require_once dirname(__FILE__).'/helper.php';

The helper class method include by:

 require JModuleHelper::getLayoutPath('mod_xyz', $params->get('layout', 'default'));

Create a file default.php

The default.php file is the template which displays the module output
The code of default.php is

 <?php
defined('_JEXEC') or die;
JHtml::_('behavior.keepalive');
echo ”Hello xyz”;
?>


Create mod_xyz.xml

Module xyz.xml is used to specify which files the installer needs to copy and is used by the module manager to determine which parameters are used to configure the module as well as other information about the module.
 
The code for mod_xyz.xml is as follows:
                    
  <?xml version="1.0" encoding="utf-8"?>
         <extension
                    type="module"
                    version="2.5"
                    client="xyz"
                    method="upgrade"
         >
        <name>mod_xyz</name>
        <author>Click 4 Joomla</author>
        <creationDate>July 2013</creationDate>
        <copyright>Copyright (C) 2013 - 2015 click4joomla. All rights reserved. </copyright>
        <license>GNU General Public License version 2 </license>
        <authorEmail>info@click4joomls.com</authorEmail>
        <authorUrl>www. click4joomla.com </authorUrl>
        <version>2.5.0</version>
        <description>MOD_XYZ_XML_DESCRIPTION</description>
        <files>
                    <filename>mod_xyz</filename>
                    <filename module=” mod_xyz”>mod_xyz.php</filename>
                    <filename>index.html</filename>
                    <filename>helper.php</filename>
                    <filename>tmpl/default.php</filename>
                    <filename>tmpl/index.php</filename>
        </files>
       <languages>
                    <language tag="en-GB">en-GB.mod_xyz.ini</language>
                    <language tag="en-GB">en-GB.mod_xyz.sys.ini</language>
       </languages>
      <config>
      </config>
</extension> 


Create a helper.php

The helper.php file contains helper class that is used to retrieve the data to be displayed in the module output. At the starts of class one method getXyz(). It will return the “Hello xyz” message

Create index.php

<html><body bgcolor="#FFFFFF"></body></html>  

T3 Framework - Installation Tutorials


T3 Framework Video Tutorials - Megamenu


T3 Framework for your Joomla! 2.5 & 3.0 Video tutorials on Megamenu covering the followings: 1. Building up your Megamenu 2. Style & Add Icons for Megamenu 3. Off-Canvas and Sticky Menu Navigation

Joomla 3.0 Getting Started - Learn the Basics of Joomla


This getting started with Joomla 3.0 webinar covers how to launch a demo trial site of Joomla and how to build a basic site using categories, articles, menus, menu items and modules.

Making a Joomla! 2.5 template in 30 minutes with T3 Framework


In this tutorial we will show you how to develop a JA T3 Framework 2.0 user theme. Free Templates For Joomla 2.5. Watch this video to find out how to set up the joomla 2.5 templates from JoomlArt. *** Content: * preparations * customize logo * customize search module * customize cpanel * customize spotlights * customize navbar * customize pathway Have fun customizing Joomla! templates with JA T3 Framework!

Wednesday, September 11, 2013

Using Tags in an Extension in Joomla! 3.1

Joomla's tagging system is used in all core content extensions and is designed to be be easy to integrate into other extensions that use standard Joomla design patterns.
Using tags in an extension is relatively straightforward but it requires small changes in a number of specific places.

Contents

 [hide

Create a content type for each view

Note: Types can be added using either sql or postflight by creating a JTableContenttype instance and adding a row.
First identify which tables contain data that will be tagged and what the name of the single item view displaying each of these tables. For example:
  • #__contact_details is the table displayed in the view contact of component com_contact with table class ContactTableContact.
  • #__weblinks is the table displayed in the view weblink of com_weblinks so WeblinksTableWeblink.

 CREATE TABLE IF NOT EXISTS `#__content_types` (
  `type_id` int(10) UNSIGNED NOT NULL AUTO_INCREMENT,
  `type_title` varchar(255) NOT NULL DEFAULT '',
  `type_alias` varchar(255) NOT NULL DEFAULT '',
  `table` varchar(255) NOT NULL DEFAULT '',
  `rules` text NOT NULL,
   `field_mappings` text NOT NULL,
 `router` varchar(255) NOT NULL DEFAULT '',
For each table/option/view you will need to make an entry in #__content_types. You can do this either using sql or postflight by creating an instance of JTableContenttype. Don't forget a category type if you use the Joomla categories API.
A string giving component.view (that would be in the page request, typically matching the model name) goes in the **type_alias** field.
table gives the complete table class information for the table class stored as a JSON object in which the first element represents your "special" table and the second an optional common table (otherwise it will default the JTableCorecontent. This includes the name of the database table, the name of the primary key, the prefix, the name, an option array as used in your constructor and getInstance() methods. This enables the tagging system (and other APIs) to access your table easily.
If you are using Joomla categories make sure to create a category type so that they can be tagged. In Joomla 3.1 and 3.1.1 there is an error where the tag field will show even if there is not a type, but this is corrected in 3.1.4.

Important note : Please note that the table name for the common table is #__ucm_content. This is INCORRECT in 3.1 and 3.1.1 data but is not currently used. The data was updated in 3.1.4.

{"special":{"dbtable":"#__content","key":"id","type":"Content","prefix":"JTable","config":"array()"},"common":{"dbtable":"#__ucm_content","key":"ucm_id","type":"Corecontent","prefix":"JTable","config":"array()"}}

The type_title field would potentially be used for display although this is not implemented currently except in the contentttype field. Usually it should begin with an upper case letter if it is in English. See note about how to make this translatable.
note:
To make your type names translatable add 
COM_TAGS_CONTENT_TYPE_ + the type_title
in both the ini and sys.ini files.
Rules is currently not used. It will likely be removed in favor of an asset_id for each type, but currently you can ignore this field which will be managed by JTable.
field_mappings maps the names of specific fields in your table to a set of standard names. This mapping is stored as a JSON array with the first element mapping to the common fields and the second one mapping the other fields from the table.
Important note The JHelperTags and JUcm APIS at 3.1.1 supported arrays for this field, but as of 3.1.4 either arrays or objects with a default of objects are supported.
'{"common":[{"core_content_item_id":"id","core_title":"title","core_state":"published","core_alias":"alias","core_created_time":"created_time","core_modified_time":"modified_time","core_body":"description", "core_hits":"hits","core_publish_up":"null","core_publish_down":"null","core_access":"access", "core_params":"params", "core_featured":"null", "core_metadata":"metadata", "core_language":"language", "core_images":"null", "core_urls":"null", "core_version":"version", "core_ordering":"null", "core_metakey":"metakey", "core_metadesc":"metadesc", "core_catid":"parent_id", "core_xreference":"null", "asset_id":"asset_id"}], "special": [{"parent_id":"parent_id","lft":"lft","rgt":"rgt","level":"level","path":"path","extension":"extension","note":"note"}]}'
is the field mapping for the Article type. Note that article uses the name attribs for the core field called params. If your table does not contain a field, put “null” instead. Leaving it blank may cause SQL issues. The special fields are optional. At a minimum for common fields you need to map: content_item_id, alias and title in order to successfully create urls in the tagged items list. You also will probably want: access, status, and language.
Router is an optional name of a static helper router method for this type found in its front end helpers folder. If you only store data in #__ucm_content you will eventually be able to leave the router field blank although this option is not currently implemented. If you do not have a custom router tags falls back to the rules found in JHelperRoute.

Modify your component's table class (or classes if you have multiple tables)

Add the following to your JTable constructor:
$this->_observers = new JObserverUpdater($this); JObserverMapper::attachAllObservers($this);
The addition material formerly located here is no longer needed after 3.1.4 Please read the document history for this page if you are required to support 3.1.0 or 3.1.1.

Add tags to the getItem() method of the model

Note: this was only required in 3.1.0 and 3.1.1. It should not be used in 3.1.4 or later. Please read the history of this page if you need instructions for older versions.

Add a tag field to edit screens

In any edit layouts where you want to allow tagging, you need to add the field to the xml and the appropriate layouts if necessary. The core layouts us a JLayout to manage this and the same layout by any extension.
Update: Note that in 3.1.1 only there is special handling of this in the core. Tags in the edit screen MUST be part of a metadata <fields></fields> group. The core provides two JLayouts to help you manage standard layouts, one (details) for the metadata and one for the sidebar that includes the tabs. In update an extension to 3.1.4 you may need to fix adjust your edit views.
In 3.1.4 or later this special handling is not necessary. Best practice is to use the standard JLayouts since this provides a consistent experience for users.
                <field name="tags" type="tag"
                        label="JTAG" description="JTAG_DESC"
                        class="inputbox span12 small" multiple="true"
                >
                </field>
The field loads all the Javascript libraries required. You don't need to worry about that.
The field supports two modes:
  • Nested tags mode. Hierarchical tag list. Doesn't support on the fly tag creation.
  • AJAX mode. Tags are searched while user types (3 min. chars required to launch the AJAX search). Custom tags are added by pressing ENTER or COMMA keys. Tags show the global route/path. Example: grandpa/parent/tag
The field mode can be forced or use the com_tags setting Tag field mode to determine its mode. To set/force the field mode we have to add mode="ajax" or mode="nested" to the tag field definition.
Example of forced AJAX mode:

                <field name="tags" type="tag" mode="ajax"
                        label="JTAG" description="JTAG_DESC"
                        class="inputbox span12 small" multiple="true"
                >
                </field>
The field also includes an attribute to allow/deny the user to enter custom values. Currently this only works in AJAX mode. The attribute has to be added to the field definition like **custom="allow"** or **custom="deny"**
Example field definition with custom tags denied:
                <field name="tags" type="tag" mode="ajax" custom="denied"
                        label="JTAG" description="JTAG_DESC"
                        class="inputbox span12 small" multiple="true"
                >
                </field>
if it is not already there. Usually multiple should be true unless you have a specific reason for it not to be. In the core components in administrator, the field is in the group shown on the right, below the language field.
Note: As of 3.1.2 if you wish to use the field to designate parent tags you must add parent="parent" to the xml definition of the field.

Prepare the view

Add an appropriate version of this to your view.html.php file before loading the layout:
$item->tags = new JHelperTags;
$item->tags->getItemTags('com_newsfeeds.newsfeed.' , $this->item->id);
The first parameter should match a type in the types table. The second parameter is the primary key under which this record is stored in your table. This would be used in any display in any view where you want the tags associated with the item to display.

Set up the display

In any layout where you want to display the tags associated with an item add:
                <?php $this->item->tagLayout = new JLayoutFile('joomla.content.tags'); ?>
                <?php echo $this->item->tagLayout->render($this->item->tags->itemTags); ?>
Changing the object and property names as appropriate.
You will most likely want to add the show_tags parameter to the item parameters, the menu item parameters and component configuration as appropriate for your use case.
        <?php if ($this->params->get('show_tags', 1) && !empty($this->item->tags)) : ?>
                <?php $this->item->tagLayout = new JLayoutFile('joomla.content.tags'); ?>
                <?php echo $this->item->tagLayout->render($this->item->tags->itemTags); ?>
        <?php endif; ?>

Batch processing

If you want to add the ability to do batch tagging to a backend list view do the following.
Add tag to the default_batch layout

        <div class="control-group">
                        <div class="controls">
                                <?php echo JHtml::_('batch.tag');?>
                        </div>
                </div>
And add tag to the button class in the modal footer (Not totally necessary at this point, but good for potential future changes e.g. if unTag is added.)
<button class="btn" type="button" onclick="document.id('batch-category-id').value='';document.id('batch-access').value='';document.id('batch-language-id').value='';document.id('batch-user-id').value='';document.id('batch-tag-id)').value=''" data-dismiss="modal">

Add a batch method to your model if you are not extending JModelAdmin or overriding the batch method.

        /**
         * Batch tag a list of item.
         *
         * @param   integer  $value     The value of the new tag.
         * @param   array    $pks       An array of row IDs.
         * @param   array    $contexts  An array of item contexts.
         *
         * @return  void.
         *
         * @since   3.1
         */
        protected function batchTag($value, $pks, $contexts)
        {
                $tagsHelper = new JHelperTags();
                $tagsHelper->tagItems($value, $pks, $contexts);
 
                return true;
        }
And modify your batch method by adding
                if (!empty($commands['tag']))
                {
                        if (!$this->batchTag($commands['tag'], $pks, $contexts))
                        {
                                return false;
                        }
 
                        $done = true;
                }
Pay attention to any JSON encoded strings that you need special handling for in batch processing -- remember that you are saving a copy of the core fields and you need save to work as expected.

That’s it, now create some tags, tag some items and you are set.

How To Use Content Tags in Joomla! 3.1

Tags in Joomla! provide a flexible way of organizing content. The same tag can be applied to many different content items across content types (articles, weblinks, newsfeeds, contacts, and catgories). Any item can have as many tags as desired.
Once an item is tagged with a specific tag, browsing to the link for that tag will give a list of all items that have been tagged with that tag.

Creating Tags

Tags can be created in two ways.
  1. You can browse to the Tags manager (link on the Components menu). There you can create detailed tags in a way similar to creating an article. Besides a name, tags can include a description, images, meta data and other items similar to all other Joomla content types. In the Tags Manager you can also choose a parent for a tag to create nested tagging.
  2. You can create tags on the fly in any content editing screen that has a tags field. Start typing the name of a possible tag. Once you get to three letters you will start to see suggested tags that alread exist. If you are creating a brand new tag finish typing the name and hit enter and the tag will be created for you when you save.

Displaying Tagged Content

Once you have tags and some tagged items you can display them in the front end in several ways.
  1. By default Joomla! will display tags embedded in each item that has been tagged. You can turn this display off by changing the parameters. You can control positioning of this display with layout overrides and alternate layouts and you can style it with your css.
  2. You can create a menu link that displays a list of tags, with links to the tagged items for each tag.
  3. You can create a menu link that displays a list of tagged items for a given tag and display either as a list or blog style.
  4. You can use one of the tags modules. Popular tags will display a linked list of the tags that have the most tagged items. Similar Tags will display a list of items that have a similar set of tags to the currently displayed item (note that this module does not display on pages that are not showing content items).

How to Install Joomla 3.1 Steps by Step

Hosting Requirements

Installing Joomla! for the first time is very easy. Joomla!’s built-in web installer makes setting up your new site a breeze.
Before we start installing Joomla!, there are a couple prerequisites that need to be met to install Joomla! 3.1 successfully. These apply whether you have a dedicated server, a shared hosting plan server, or are installing a copy on a local computer for testing or development.
You’ll need to meet the following requirements below to install and use Joomla! 3.1 Joomla 3.1
SoftwareRecommendedMinimum
PHP (Magic Quotes GPC off)5.3.1 +5.3.1 +
Supported Databases:
MySQL[1] (InnoDB support required)5.1 +5.1 +
MSSQL10.50.1600.1 +10.50.1600.1 +
PostgreSQL8.3.18 +8.3.18 +
Supported Web Servers:
Apache(with mod_mysql, mod_xml, and mod_zlib)[2][3]2.x+2.x+
Nginx1.11.0
Microsoft IIS77
You will need two complete two tasks before you can install Joomla! on your server. First, you will need to download the Joomla! package files. Next, you will need to have a database for Joomla! use.

Downloading and Uploading Joomla! Package Files

  1. Download the current release of Joomla! 3.1
  2. Move the downloaded Joomla! installation package to the server. Use a FTP Client to transfer the Joomla! 3.0 files to your server. If you don’t already have an FTP client, we recommend Filezilla
Hint - This can be accomplished by simply moving the downloaded package to your server, then unpacking it. Or you can unpack the files on your local computer, then move the Joomla installation over to your server. Either way, the Joomla installation needs to be unpacked in the root of your site.
Stop hand nuvola.svg.png
 Warning!
If you unpack the files on your own computer, then copy them to your server, be sure to move only the folders and files contained INSIDE the Joomla! package. If you unpack the folders and files into a folder, for example called, Joomla and then upload that folder, your site will have to be accessed at yoursitename.com/Joomla instead of yoursitename.com.

Database for Joomla! Installation

  1. If you need to create a database, please read "Create a database for use with Joomla!" first or skip to step #2.
  2. You will need to note basic database information needed when the actual Joomla! installation is started.
    • Location of datase, localhost? Or a specific host's server such as dbserver1.yourhost.com
    • The database name
    • The database user's name
    • The database user's password

Main Configuration

With the above requirements met, a database created and the required Joomla! files in place, you are ready to install Joomla!. Start the Joomla! web installer by opening your favorite browser and browsing to the site's domain name. On host installation you will use http://www.yoursitename.com. If your are installing Joomla! locally, you will usehttp://localhost/<path to joomla files>, and you should see the installation screen.
J30 Installation screen page 1.png
Joomla! will try to identify the Select Language field automatically from your browser's language. You can change this if needed.
Fill in the following information.
  • Site Name: The name of your website — this can be changed at any point later in the Site Global Configuration page.
  • Description: Enter a description of the website. This is a the global fallback meta description used on every page which will be used by search engines. Generally, a maximum of 20 to 25 words is optimal. Again, this can be changed on the Site Global Configuration page at any time. For more on metadata, see Global Metadata Settings and Entering search engine meta-data.
  • Admin Email Address: The admin email address. Enter a valid email in case you forget your password. This is the email address where you'll receive a link to change the admin password.
  • Admin Username: Joomla! uses a default "admin" as the username for the Super User. You can leave it as is, change it now(which a good Security measure) or use My Profile in theAdministration interface to change it later.
  • Admin Password: Remember that super user has maximum control of the site (frontend & backend), so try to use a difficult password. Use My Profile in the Administration interface to change it later. Confirm the password in the Confirm Admin Password box.
  • Site Offline: Click the Yes or No box. Yes - this means when installation is complete, your Joomla! website will display the 'Site is offline message' when you browse toyoursitename.com to view the home page. No - this means the site is live when you browse to yoursitename.com to view the home page. You can use the Site Global Configuration in theAdministration interface to change the Offline status at any time.
When everything on the first page is completed, click the next button to proceed:

Database Configuration

You will need to enter the information about the database you will use for Joomla! now. It was suggested to write this information down under "Prepare for Install" tab. You may also read or review Creating a Database for Joomla!.
J30 Installation screen page 2.png
For simplification, these intructions are a reference to installing with a MySQLi database. The instructions on the installation page are self explanatory, but here they are again:
  • Database Type: MySQLi is the common database used
  • Hostname: Where is your database located? Common is localhost, but some hosts use a specific database server such as dbserver1.yourhost.com
  • Username: The username used to connect to the database
  • Password: The password for the database's username
  • Database Name: The name of the database
  • Table Prefix: One is generated automatically, but you can change it. For example, jos3_ can be used. Just don't forget to put the underscore character(_) at the end of the prefix.
  • Old Database Process: Should the installer backup or delete existing tables during the installation of new tables? Click, Yes or No to select the choice.
All these choices can be edited on the Site Global Configuration page, under Server options after the installation is completed. Note, you will break your installation if you change these settings after installation unless you have a complete copy of the current database being used by the Joomla! installation. Common uses would be to update the username and password of the database or to complete a move of an existing installation to a new host with different parameters.
When all the information has been filled in, click the next button to proceed:

Overview

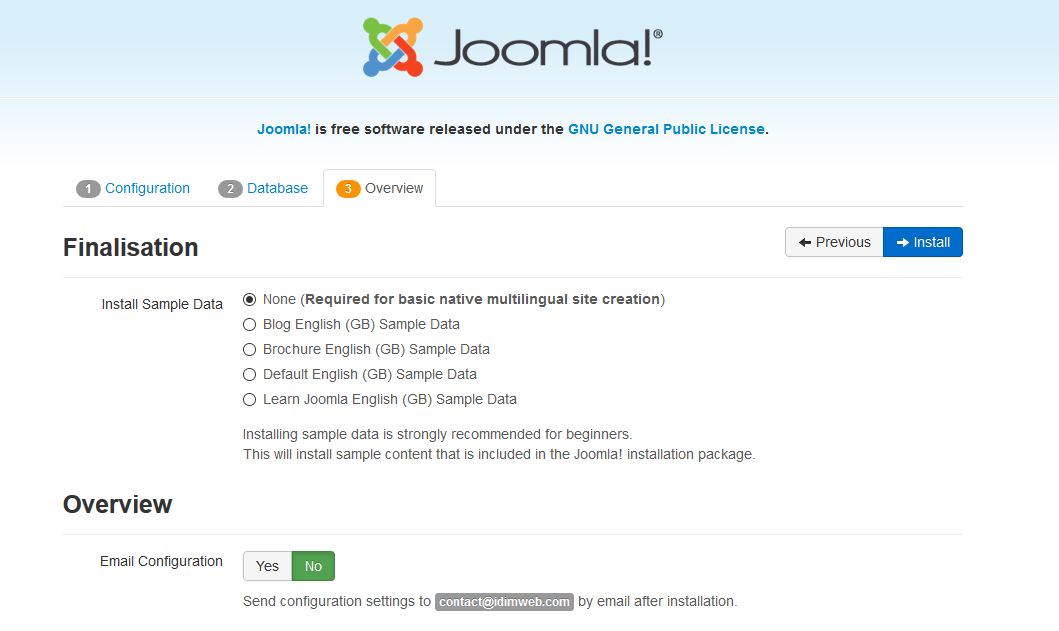
It is now time to finalise the Joomla! installation. The last page of the web brower installation contains all the information about the installation. This includes the options(at the top) for installing sample data and the installation's configurations(at the bottom).

Install Sample Data and Email Configurations

The first options are for automatically installing sample content to the website and emailing the configuration settings.
J30 Installation screen page 3 top.png
If you are new to Joomla! it would be benefical to install some sample data to see how Joomla! works. You can at this time choose to have the configuration settings emailed to you. If the Email Configuation choice is selected, the Email Password choice will appear. The email password is off by default for security. You can choose to have the password included, just click Yes.
Time to check the configurations of your install and the environment of the installation.

Checking Your Configurations

If everything is in order, you will see the install at the top of the overview page. If not, this is the place to check and see what may be causing an issue.
J30 Installation screen page 3 bottom.png
The section is broken into 4 groups:
  • Main Configuration: All the website specific information, such as the website name, description, admin username, etc.
  • Database Configuration: Contains the information about the database Joomla! will use.
  • Pre-Installation Check: These requirements must all be shown as Yes, otherwise you will not be able to install Joomla! With the exception of the PHP Version, the rest are usually controlled in the php.ini. You may need assistance from your host in correcting these settings or checking to see if it is possible to adjust them. For more information, see PHP configuration file file.
  • Recommended Settings: These are settings are recommended in your PHP configuration, but will not prevent Joomla! from being installed. You can refer to the above instructions on how they may be changed.
If everything is correct and all checks are passed, you may now click the Install button in the top right corner of the Overview page. This will start the actual installation process.
After you click the Install button, you should see a progress bar with additional information of the installation. Once the installation completes, you should see the success page!

Success and Finishing Up the Installation

Congratulations! Joomla! 3 is now installed, but there is one last step to complete the installation and start using your Joomla! powered site. You must delete the Installation Folder. Click on Remove Installation folder and a success message will appear. Now you can navigate to the Administrator log in by clicking Administrator or go right to your site by clicking Site.
J30 Installation screen page 4.png